Factory and Warehouse Setup Guide
Use this guide when the camera is installed in the factory or warehouse, for either VistaZ or VistaZ Power. Follow the shared preparation, activation and dispatch process below. For a camera installed at the store—including VistaZ Power with only its cable fitted at the factory—see Field installation.
Deployment at a glance
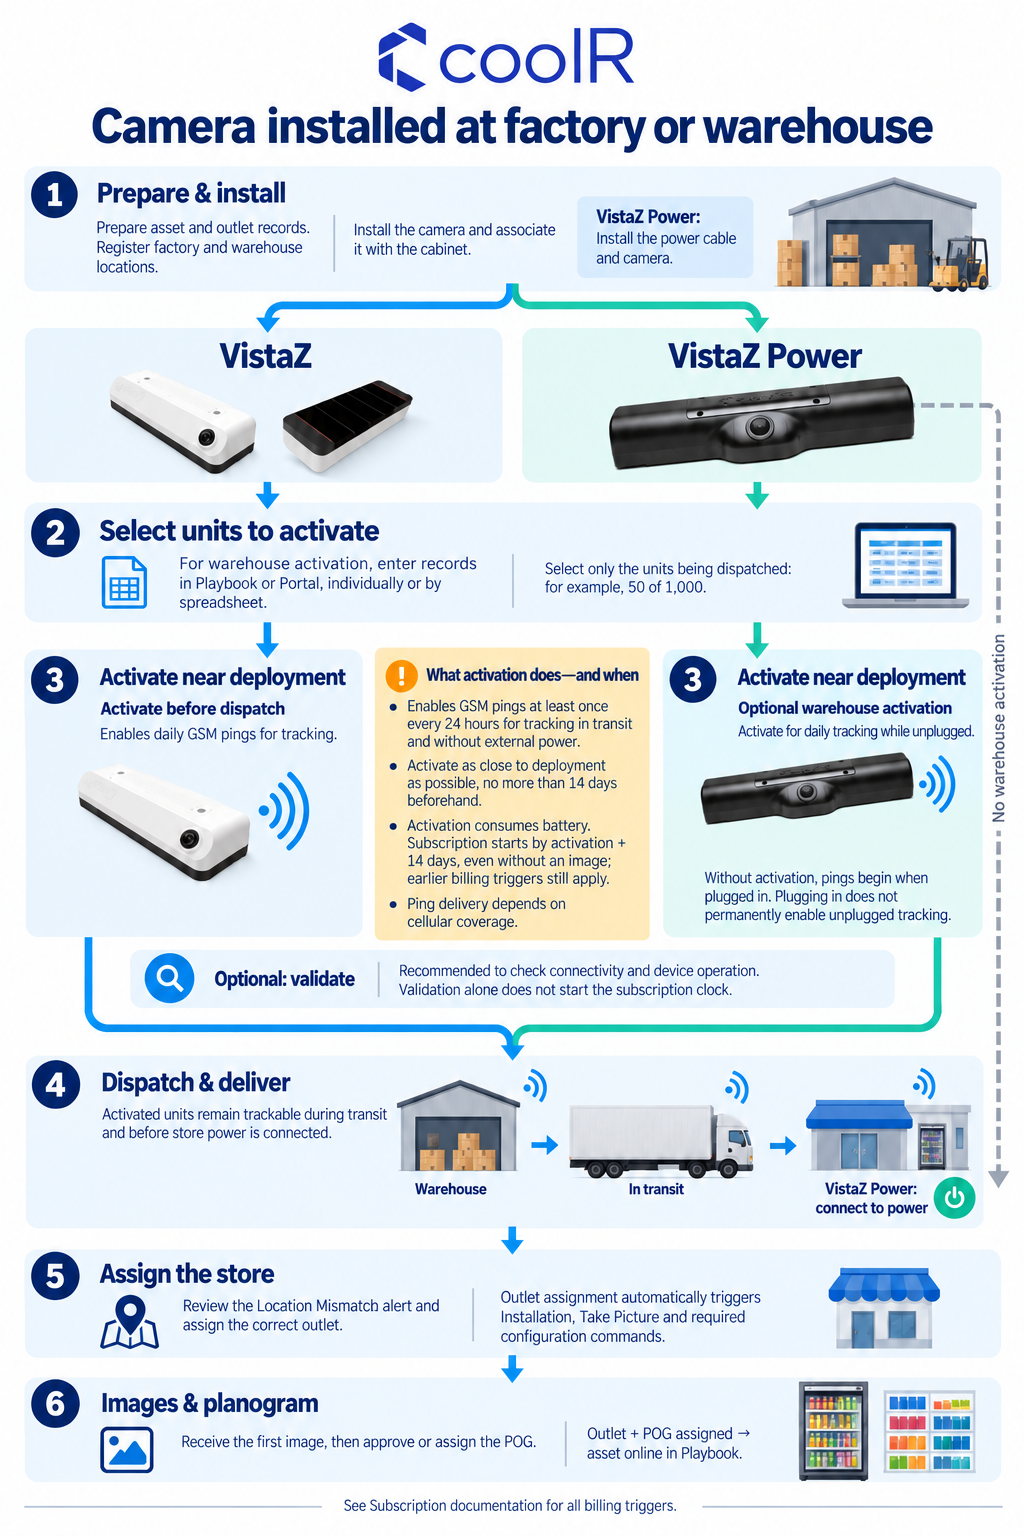
Select the infographic to view it at full size. The procedures below provide the same information in text.
What activation does and when to do it
Activation enables GSM pings at least once every 24 hours for asset tracking, including transit and periods without external power. This supports both walk-away deployment and general tracking. Ping delivery depends on cellular coverage.
Activate as close to field deployment as possible, no more than 14 days beforehand. Activation consumes battery. For VistaZ and VistaZ Power, subscriptions start no later than activation + 14 days, even without an image; an eligible image or the shipment deadline can start the subscription earlier. See Subscription for the authoritative billing rules.
| Device | Before dispatch | Without warehouse activation |
|---|---|---|
| VistaZ | Activate to enable daily tracking. | Pre-deployment tracking is not enabled. |
| VistaZ Power | Activation is optional; use it to track the unit while unplugged. | The device sends pings when connected to power. Plugging it in does not permanently activate tracking while unplugged. |
For example, an activated VistaZ Power cabinet dispatched on September 29 can remain trackable during five days in transit, or after delivery if the store has not plugged it in. Without activation, connecting power is needed for pings in this deployment path.
Validation is optional and recommended. It checks connectivity and device operation to catch problems before field deployment. It takes additional time and may accompany activation, but validation alone does not start the activation clock. Store image capture and the asset's online status are separate milestones, described under store assignment.
Terminology
A few terms are used precisely and differently throughout this document — worth checking before reading further:
| Term | What it means |
|---|---|
| Asset | The cabinet/cooler itself — the equipment record in CoolR. Not the camera. |
| Smart Device | The camera unit itself. One Asset can have more than one Smart Device. |
| Association | Recording, in the CoolR system, which camera serial number belongs to which asset serial number. This is a data-linking step only — it does not require the device to be powered on or connected. |
| Validation | Actually confirming a device works — image capture, sensors, connectivity — typically over Bluetooth, before it leaves the warehouse. Distinct from Association. |
| Activation | Enabling daily GSM tracking, including while unplugged. See what activation does. |
| Outlet | The store/location record an Asset gets assigned to once actually deployed. |
| Location Mismatch alert | An automatic Playbook alert raised when a device's pings show it has moved away from its known factory/warehouse location and settled somewhere new — the signal that it's time to assign it to a real Outlet. |
| POG (Planogram) | The expected product layout for a location. CoolR automatically proposes one from a cabinet's first captured image; a rep approves it or assigns a saved one. |
| "Online" (asset status) | An Asset only shows as online in Playbook once both its Outlet location and its POG have been assigned — not simply once the camera starts sending images. See store assignment. |
1. Responsibility Summary
| Role | Responsibility |
|---|---|
| CoolR | Create the customer in CoolR, ship VistaZ Power and VistaZ devices to the OEM, create the Warehouse Store, set up users, support camera/cabinet association, and assign cabinets to the Warehouse Store where required. |
| Customer | Set up the required master data, including stores, cabinet/asset serials, and asset types. |
| OEM | Install cameras at the factory, install cables for VistaZ Power, associate cameras with cabinets, share association details with CoolR and the Customer Warehouse, and dispatch cabinets to the Customer Warehouse. |
| Customer Warehouse | Select the units for activation, activate VistaZ or optionally VistaZ Power for unplugged tracking, and dispatch cabinets to the store. |
| Store Owner / POS | Receive the cabinet and connect it to power. |
| Sales Rep | Monitor system alerts and assign the camera/cabinet to the correct outlet/location when required. |
2. End-to-End Process
CoolR Setup: Customer and Warehouse
CoolR Responsibilities
Before factory installation begins, CoolR will:
- Create the Customer in the CoolR system.
- Ship the required VistaZ Power / VistaZ devices to the OEM.
- Create the Warehouse Store in the CoolR system.
- Set up the required users.
- Register the Warehouse Store as a Warehouse-type Outlet in Playbook (Playbook → Configurations → Outlets), before any cabinets ship. This must be done before shipments begin.
The Warehouse Store acts as a temporary system location for the cabinets while they sit at the OEM or Customer Warehouse, before they reach the actual POS/store.
Outcome: Once the customer, Warehouse Store, and users are created, the CoolR system is ready to receive camera/cabinet data. The Customer can begin preparing master data, and the OEM can begin the factory installation and association process.
Without this setup, no camera-to-cabinet association can be recorded in the system. Registering the Warehouse Store as a Warehouse-type Outlet ensures that pings received while a cabinet is staged there are recognized as expected and do not trigger a false Location Mismatch alert (store assignment).
Customer Responsibilities
The Customer will prepare the required master data:
- Stores
- Asset/Cabinet serial numbers
- Asset Types
The required Asset Type must exist in the CoolR Portal before the asset/device association process is initiated.
Outcome: Once this master data exists, every cabinet the OEM installs a camera on can be correctly recognized and categorized in CoolR at the point of association. If Asset Types are missing, association (Section 4) will fail or the cabinet will be recorded incorrectly.
3. OEM Factory Installation
Camera and Cable Installation
OEM Responsibilities
The OEM installs the camera on the cabinet at the factory. The steps differ slightly by device type:
| Step | Standard VistaZ | VistaZ Power |
|---|---|---|
| Install camera | ✅ Install the camera on the cabinet according to the agreed factory installation process. | ✅ Install the VistaZ Power camera. |
| Install cables | Not required. | ✅ Install the required cables on the cabinet. |
| Complete physical installation | ✅ On the production line/factory. | ✅ On the production line/factory. |
Outcome: At this point, the camera is physically mounted on the cabinet but has not yet been recorded or recognized in the CoolR system. The camera and cabinet remain functionally unlinked until the association step below (Section 4) is completed; record the association so incoming device data can be matched to the correct cabinet.
4. Associate Camera with Cabinet
The OEM is responsible for associating the camera with the cabinet in the system — this is what turns the physical installation into a system-recognized pair.
There are two supported approaches:
| Option A — One-by-One | Option B — Bulk | |
|---|---|---|
| How | Mobile App, per unit | CSV import via CoolR |
| Best for | Smaller volumes, factory floor | Large volumes |
| Connectivity needed | None for Associate Only; Bluetooth for Associate & Validate | None |
| Warehouse Store placement | Manual — CoolR must assign it separately | Automatic — included in the import (Outlet Code) |
| Performed by | OEM | OEM or Customer provides data; CoolR performs the import |
Option A — One-by-One Association
The OEM can associate each cabinet and camera individually using the Mobile App → Devices → Factory Install screen, entering the Asset Type, Asset Serial #, and Vista Serial # for each unit.
Two sub-options are available at this stage:
| Sub-option | Connectivity needed | What it does | Best for |
|---|---|---|---|
| Associate Only | None | Pure data-linking step (see Terminology) | The factory floor — fastest option |
| Associate & Validate | Bluetooth | Adds a functional check that confirms the device actually works | The warehouse stage, when the extra check is worth the added time per unit |
📄 Full screen walkthrough: Factory Install — Mobile App
Outcome: Once entered, the camera and cabinet become linked as a single record in CoolR. However, this record is not yet placed in the Warehouse Store — it exists in the system, but without a location. CoolR must complete the next step below to place it correctly. If Associate & Validate was used, the record additionally confirms the device is functionally working at this point.
CoolR Responsibility After One-by-One Association
If the OEM completes the association one by one, CoolR must assign the associated cabinet to the Warehouse Store from the CoolR Portal.
The Warehouse Store assignment is required so that the cabinet has the correct temporary warehouse location in the CoolR system before it is dispatched to the Customer Warehouse.
Outcome: Once CoolR completes this assignment, the cabinet correctly shows the Warehouse Store as its current location in the system. This is what allows the Customer Warehouse to later find and process the cabinet during activation (warehouse activation).
Option B — Bulk Association
If the OEM does not perform the association one by one, the association can be completed through a bulk import instead.
The OEM/Customer can provide the required cabinet and camera details, and CoolR will perform the bulk association.
Required details:
| Field | Description |
|---|---|
| Outlet Code | Warehouse Outlet Code |
| Asset Serial Number | Cabinet/Freezer Serial Number |
| Asset Type | e.g. 5 Basket, Upright |
| Smart Device Serial | Camera Serial Number |
| Tag Number | Asset Barcode |

Template: Bulk Association
Outcome: Because the Warehouse Outlet Code is included as part of the bulk import itself, cabinets processed through bulk association are placed directly into the correct Warehouse Store as part of the import — unlike Option A, there is no separate manual Warehouse Store assignment step required afterward.
5. OEM Shares Association Details
After the camera-to-cabinet association is completed, the OEM will share the relevant details with:
- CoolR
- Customer Warehouse
The information should allow the teams to identify:
- Cabinet/Asset Serial Number
- Camera Serial Number
- Asset Type
- Warehouse information, where applicable
The OEM will then dispatch the cabinets to the Customer Warehouse.
Outcome: Sharing this information allows the Customer Warehouse to anticipate incoming shipments and match physical cabinets with system records when they arrive. This enables the warehouse activation process (warehouse activation) to run smoothly without requiring the cabinets to be identified again.
Select units for warehouse activation
Before either mobile activation workflow, create activation records in Playbook or Portal for only the units you intend to activate. Enter records individually, or upload a spreadsheet to combine many assets at once. The spreadsheet is a convenience, not a requirement.
For example, if a warehouse holds 1,000 cabinets but only 50 are being dispatched, select those 50. The mobile app uses these records to identify eligible units instead of activating every nearby device.
For a bulk upload, use CoolR Portal → Master Setup → Activation → Import, or share the details with CoolR for upload.
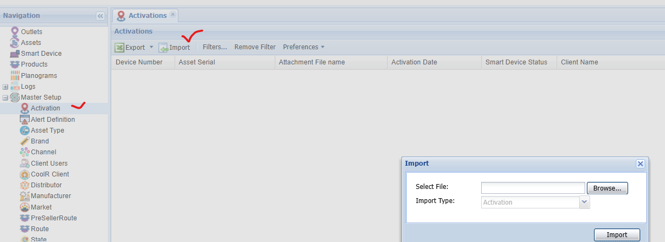
| Field | Description |
|---|---|
| Master Case | Optional |
| Base Model | Freezer type |
| Asset Delivered Serial Number | Cabinet/freezer serial number |
| Asset Delivered Barcode | Cabinet barcode |

Download the Activation template.
Activate selected units
Complete activation within the deployment window. For VistaZ Power, follow these steps only when choosing warehouse activation for unplugged tracking.
| Workflow | Use it for | Instructions |
|---|---|---|
| Bulk activation | Activate the selected units in a scan; review each result. | Warehouse Activation |
| Individual activation with validation | Activate and check a particular unit before dispatch. | Warehouse Activation & Validation |
Activation enables tracking. It does not replace store assignment or planogram assignment. Optional Validate and Prepare checks can help identify device or firmware issues before dispatch.
Dispatch and store assignment
- Confirm the cabinets are ready and dispatch them to the store. Activated units can report their location during transit, subject to coverage.
- At the store, connect VistaZ Power to power and keep it powered. Without warehouse activation, this allows it to send pings; it does not permanently enable unplugged tracking.
- When pings indicate movement away from the known factory or warehouse to a new location, review the Location Mismatch alert and assign the correct outlet. See the walk-away alert procedure.
- Outlet assignment automatically triggers Installation, Take Picture and required configuration commands, including VistaZ Power time-slot configuration. Nobody needs to send these commands manually.
- After the first image, approve the proposed planogram (POG) or assign an existing one. The asset shows as online in Playbook once both outlet and POG are assigned.
If the destination is already known or the alert workflow cannot be used, provide it to CoolR for manual outlet assignment. The same automatic post-assignment commands apply. Device communication still requires connectivity.
Responsibilities at deployment
| Role | Responsibility |
|---|---|
| Customer Warehouse | Select and activate the intended units as applicable, optionally validate them, and dispatch. |
| Store staff | Receive the cabinet and connect VistaZ Power to power. |
| Customer / Sales Rep | Review location alerts, assign the correct outlet, and approve or assign the POG. |
| CoolR | Support master data, association, and manual outlet assignment when needed. |