Factory Install
The Factory Install process is designed to link devices to assets at the factory and send data using a hub. This method is primarily used for WiFi Vista installations, ensuring seamless connectivity and provisioning.
Layout
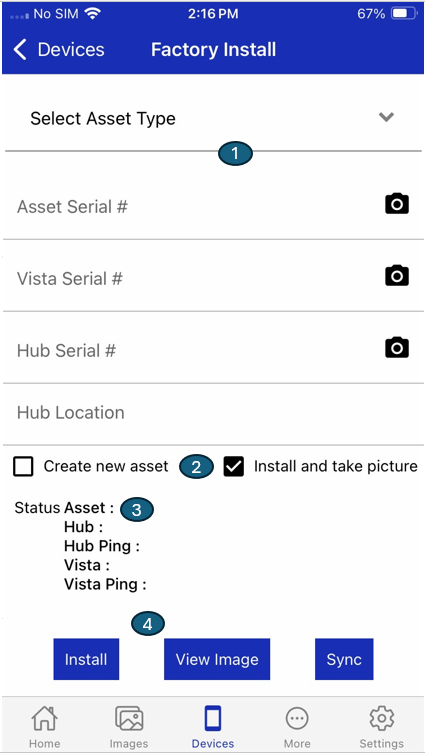
The Factory Install screen is organized into four main sections, each guiding the user through a specific part of the installation workflow:
1. Screen Elements
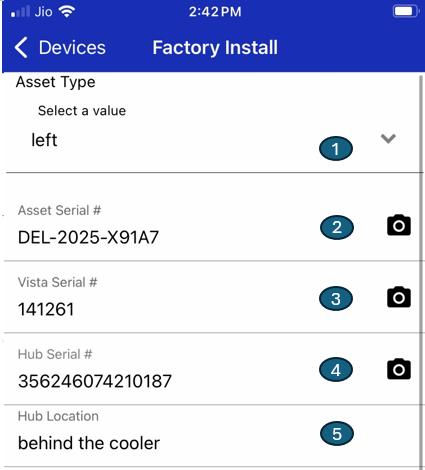
1. Asset Type:
Select the type of asset being installed (e.g., Vehicle, Equipment, Container) from a dropdown list. This determines the configuration and provisioning requirements for the device.
2. Asset Serial #:
Enter the unique serial number of the asset, or use the built-in scanner to quickly capture the serial number from a barcode or QR code. This links the device to a specific asset for tracking and management.
3. Vista Serial #:
Enter or scan the serial number of the Vista device being installed. This ensures the correct device is provisioned and associated with the asset.
4. Hub Serial #:
Enter or scan the serial number of the Hub (if applicable). This links the Hub to the asset and Vista device, enabling communication and data aggregation.
5. Hub Location:
Get the assigned location of the hub which is auto populated from the server.
2. Options

1. Create new asset:
Enable this option if the asset does not already exist in the system. The app will create a new asset record and associate it with the entered serial number and details.
2. Install and take picture:
If this option is enabled, the app will prompt the user to capture a photo of the installed device or asset during the installation process. This image is stored for documentation and verification purposes.
3. Status
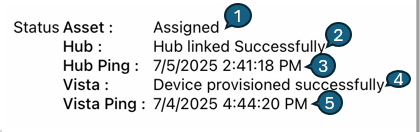
Monitor real-time feedback and validation:
1. Assignment and Provisioning Status:
Displays the current status of the asset, hub, and Vista device assignments. Indicates whether each component has been successfully linked and provisioned.
2. Hub:
Displays the current status of the hub:
- Found: Hub detected and available for assignment
- Already Assigned: Hub is already linked to a device
- Assigned: Hub has been successfully assigned
3. Hub Ping:
Shows the timestamp of the latest successful ping from the hub.
4. Vista:
Indicates the provisioning status of Vista:
- Provisioned: Vista has been successfully configured
- Not Found: Vista is not detected
- Already Linked: Vista is already associated with a device
5. Vista Ping:
Displays the latest communication timestamp received from Vista.
4. Actions
Perform key installation and management tasks:

1. Install:
Initiates the installation and provisioning workflow. The app validates all entered information, configures the device, and updates the system records.
2. View Image:
Allows the user to view the captured installation image (if taken). This is useful for quality assurance and future reference.
3. Sync:
When click on sync it will run the background service to execute the Take Picture command, download and upload images to the server.
By following this structured, step-by-step process, factory personnel can ensure that each device is fully configured, validated, and documented before leaving the factory. This supports end-to-end traceability, reduces deployment errors, and upholds high standards of quality control throughout the device lifecycle.